

General Information
In WhatsApp, you have 24 hours to answer a customer’s message. Outside of this time frame, you have the option send the user a Notification. WhatsApp notifications are cost-based, and the cost is determined based on which country the customer’s phone number is from. Please note that from February 1, 2022 WhatsApp will use a new pricing and charge for both user-initiated (conversation originating from the user) and business-initiated (originating from the company) messages. Information and the then valid pricing table can be found here.
All notifications have to be verified by WhatsApp in a primary creation stage. Please make sure that your Notifications comply with WhatsApp’s guidelines.
You can currently send text messages alone or in combination with multimedia content (PNG, JPG, MP4, PDF) as notifications. WhatsApp offers more information here.
It’s important to note, that templates always have to be connected to a use case. Each Notification has to have a specific purpose, which should be clear in the text that you put forth for approval. A possible Notification could look like “Hello {1}, online check-in for your flight to {2} is now available“. It’s not possible to create a notification that is empty or consists exclusively out of placeholders.
Creating Notifications
Go to Settings/Account/WhatsApp Notification Templates, where you’ll find the Notification overview.

By clicking on the plus symbol, you can create a new Notification:
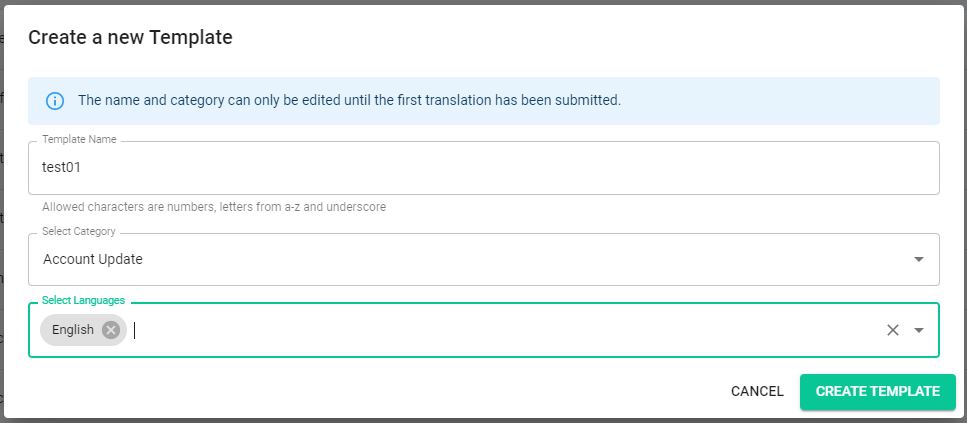
- Enter a name for the notification (consisting of alphanumeric characters (A-Z, 0-9, only lowercase letters) and underscores (_); spaces are not allowed).
- Select a category to which your notification belongs:
- Marketing – Send promotional offers, product announcements, and more to increase awareness and engagement.
- One-time passwords – Send codes that allow your customers to securely access their accounts.
- Transactional – Send account updates, order updates, alerts, and more to share important information.
- Select a language for your notification and then click on the “Create template” button.

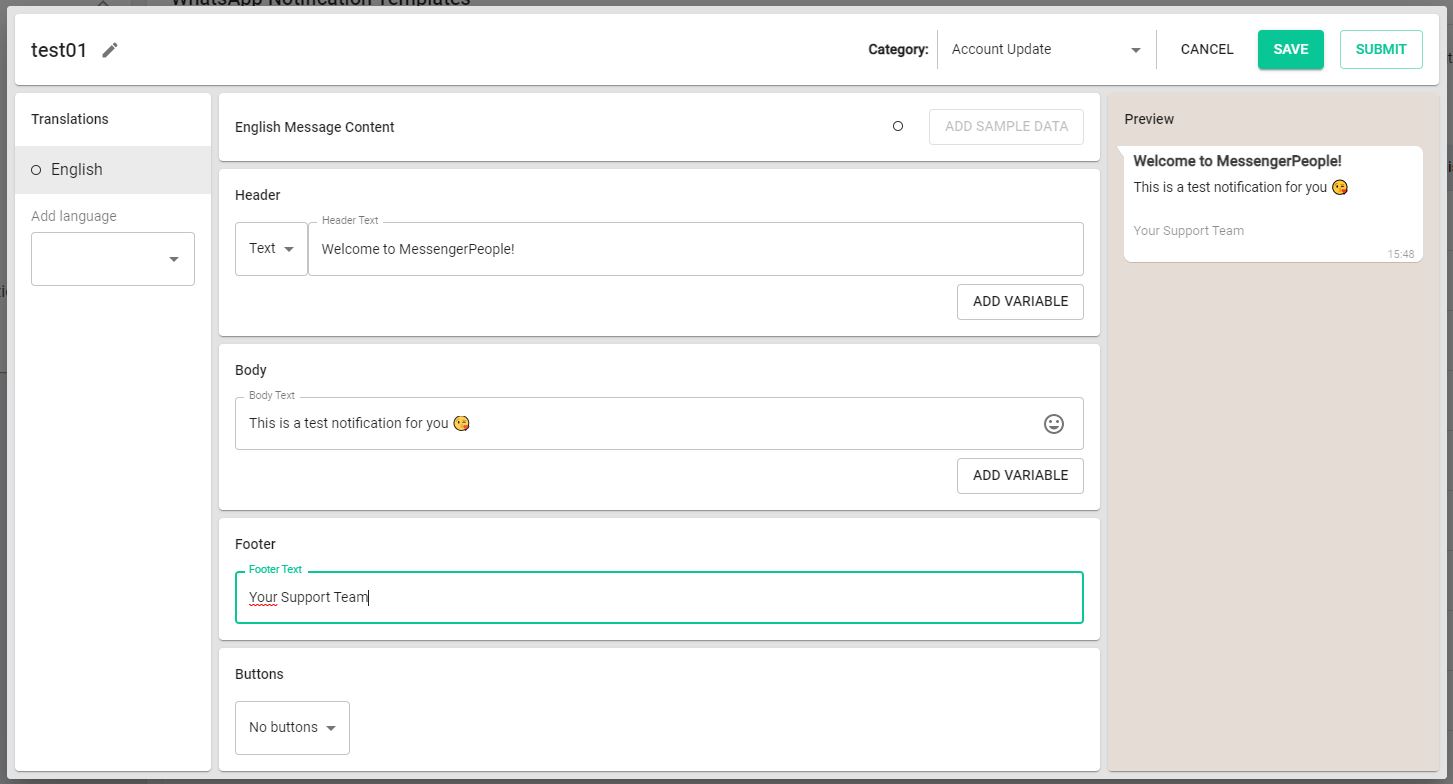
- A template consists of:
Header (optional / max. 60 characters / no boldtype) -> the following multimedia content is possible: image (PNG, JPG), video (MP4), documents (PDF)
Body (mandatory / max. 1024 characters)
Footer (optional / max. 60 characters / no boldtype)
Buttons (optional) -> there are two types of buttons:
– Quick Reply: This allows the user to easily send a text message via button, such as “Yes”, “No”, “Maybe” (text only, max. 3 buttons, max. 20 characters each)
– Call To Action: Here, a URL or a telephone number is stored behind the button, i.e. the user is directed to a website by clicking on the button or his telephone app opens and he can call directly. For the URL, you can choose between a static URL or a dynamic URL. The dynamic URL contains a variable and can therefore refer to different menu items within a website. The agent must fill this variable when sending the notification.Translated with www.DeepL.com/Translator (free version) - Write your text in the body. Here you can use variables at certain points (+ variable). These are placeholders that are replaced by customer-specific data when the template is sent. In the example here, the first variable {{1}} is replaced by the customer’s name and the second {{2}} by the sender’s name.
- If desired, you can add multimedia content in the header and additional information (e.g. your company name) in the footer. The header is also a placeholder for which you can insert the desired images later when you send them, similar to the variables in the text.
- Select other languages in which you would like to send out this notification and type in the appropriate text. Notifications in different languages are individually verified by WhatsApp.
- Click “Save” to create a notification. Now it is shown in the overview. Click on the three vertical dots next to the notification name to edit it.
- When your template is ready, you can send it to WhatsApp for verification by clicking on the “Submit” button. From now on you can no longer edit the notification. You can see the current status of the notification (green – approved; orange – in progress; red – rejected, white – not yet sent in for verification) in the overview.

As soon as your Notification has been accepted, it can be used. You can send Notifications over the API, manually in the work interface or via the ticket list.