

To be able to send content via Messenger, the following steps are necessary:
- Configure MIA settings
- Command menu call
- Command menu
1. Configure MIA settings
Go to settings >> channel >> MIA settings.
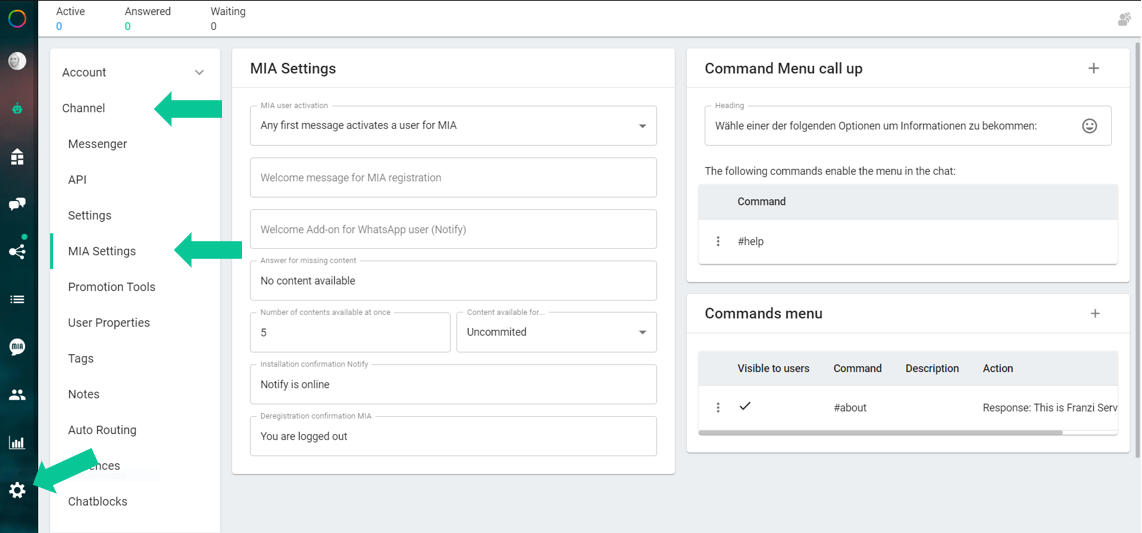
Under the menu item MIA Settings, you can configure the following settings:
MIA user activation
Option 1: Every first message activates the user for MIA
- For every first message the user will be activated for MIA and will receive content that you publish.
Recommendation: We recommend this setting if you want to offer “1:n communication” as a messenger service.
Option 2: Special message activates the user for MIA
- Only the MIA activation word defined by you (e.g. start) activates the user for MIA.
Recommendation: We recommend this setting if you want to offer both “1:n communication” and “1:1 communication” as messenger service.
Welcome message for MIA registration
If you enter a message here, then every user who has activated for MIA will automatically receive the “welcome message”.
Note: You can also define the “Welcome Message” in the Chatbot Builder. In the Chatbot Builder you can create an individual “welcome message” for each messenger.
Welcome add-on for WhatsApp (Notify)
If you leave a message here, then every user who uses the app “Notify as a push app” will automatically receive the “Welcome add”.
The welcome message serves as an additional message/information for all WhatsApp users who have not yet installed Notify.
Response for missing content
WhatsApp users do NOT receive your content automatically, but have to retrieve it on their own with the command #top. You can also define your own commands, with which the user:in can “pop” the content. If the WhatsApp user has already retrieved all available content with the command #top, then he/she will automatically receive the stored response, e.g.: “Sorry, there is no new content available at the moment.”
Number of contents retrievable at once
Here you can define how many messages a user should receive when he sends the command #top once.
Content available for …
There are contents that are only valid for a certain period of time, e.g. daily offers.
Here you can define the period in which your content is available.
Note: This setting cannot be applied selectively to certain content.
Notify installation confirmation
If a user does not have Notify installed on his/her smartphone and installs the Notify app with the help of the welcome add-on, he/she will receive a confirmation after successful installation.
Logout confirmation for MIA
If you leave a message here, then any user:in who deactivates for MIA will automatically get this “unsubscribe confirmation” sent. A user can unsubscribe independently at any time with the keyword “Stop”
2. Command Menu Call
In MIA you also have the possibility to offer your users a simple menu for orientation. The menu can be called by the user with the command #help.
Headline
- Here you can define the text for the headline e.g.: “Choose one of the following options to get information: …”
Command
- With the plus icon you can add more commands, which will also call the menu in Messenger.
- Using the menu icon you can edit and delete the commands.
3. Command Menu
Here you can define which menu commands and their actions you want to offer to your users.
- With the plus icon you can add more menu commands.
- With the menu icon you can define the position (order) of the command in the menu and also edit and delete it.
You can choose from the following actions for a command:
Action: Response
User receives the response you defined. A response can consist of a text message and a file.
Action: Activate chatbot
User is redirected to a chatbot topic.
Action: Return published content
User receives the previously published content.